Saturday, February 16, 2013

How to Procrastinate by being Productive

My plan for today was to get the torso pieces of my muslin sewn together. I know this is a quick process which makes it odd that I've managed to get sidetracked at this point of all points, but hear me out. If you look at my post from yesterday, you'll see my workspace in the background of the pictures towards the bottom. It consists of a couch that I sit on, a loveseat next to me with some extra supplies strewn across it, with a large ottoman in front of me that I work on top of/set my sewing machine on to work.

Due to the fact that I share the house I live in with three other people, I can't keep it all laid out like I might if it were just me, and even then I shouldn't. Therefore I decided to take some time to reorganize some of my crafting supplies into storage containers so that the process of setting it all up and taking it all down will go a bit more smoothly in the future. This will also be really helpful to already have a place for everything when I move the beginning of May.

First things first, I gathered together everything I could find for supplies, tools, materials, and appliances that I use for crafting and sewing of any sort. To give you some scope of how spread out it all was, I was simply throwing everything in a large plastic bag and it took me a full fifteen minutes to get all of the nooks and crannies checked to make sure I got everything.

Then I split it all up into categories: cloth materials, writing utensils, sewing accessories, embroidery misc, etc, etc, etc.

These I placed into various boxes and containers. It's not completely done, but I got about 4-5 boxes started and a bag full of items that could go multiple places and I haven't decided what to do with. Here are a few of my completed boxes, I still have a few desk drawers with a nice variety of office supplies all in one place that I use frequently both in and outside of craft projects. Sorry I didn't take any "during" pictures, but I had really intended to get some work done on my muslin (and the evening is still young, so who knows) but I had to make sure that I got something posted for you all to chew on.

It's not a perfect system, and it isn't meant to be permanent, but I'm in a pinch, and it'll certainly do.

Enjoy!!!


Sewing supplies, thread, cutting tools, pins, needles, etc.


My current fabric "stash" is literally contained withing this box...I will look back someday (hopefully soon) and laugh.


Mostly writing utensils, some rubber bands and ribbon to help fill in the extra space. Note: this container is a 12"x12" scrap booking box that was on sale at Michael's in Jan for around $3-$4, clear with a lid that snaps and they stack wonderfully.


The box below used to be my Hardanger supplies, it's an old tissue box with cut off plastic cup bottoms attached to separate off balls of #5 perl cotton embroidery thread. I'm going to be moving this all to the lovely Dr. Who  lunchbox that my boyfriend gave me for Valentine's Day to keep by my bedside and travel with easily.


Everything that I have packed up so far, there are also some items that don't fit in most boxes, my singer, cutting mat, tailor's curve, quilting ruler, and portable ironing board. I'm going to be putting everything into one big Sterilite tub for the move, and possibly for temporary storage in my new home until I can construct a sewing/crafting space.


Friday, February 15, 2013

Cutting my Muslin and Adventures in Alterations

Felicitous Friday Folks!

I'm thrilled to say that I've begun work on my muslin in earnest, getting all of the pieces cut out. A couple of nights ago, I had a revelation that I thought I'd share with you all. To some of you this will definitely be a "Well duh" sort of thing, but it took me a while to figure it out on my own, and there aren't a lot of resources out there for altering a pattern.

The jacket I made my pattern from is about 2 inches too narrow in the torso, I was originally planning to add these inches to the side panels, but I was worried about how this would translate to the shape and size of the arm hole. Then, like a bolt from the blue, is this. Triangles. I can add the two inches necessary in the back piece at shoulder level, but taper it down so that I don't spread my double vent to ridiculous proportions. The rest I'll add to the side seams, but in the opposite direction, the full two inches at the bottom, tapering up to a point that avoids the arm hole completely. It will most certainly take a couple of tried to get it right,  but that's what muslins are for, right?!

Today I thought I'd share with you some experience I've had recently with altering existing jackets. Specifically taking out the sleeves. I have done this to two separate thrift store gems in the last month or so in order for them to cover both my arms AND my wrists (the joys of being 6' 2" with a 42" chest).

Keep in mind, this is not following any "proper" technique, but is rather me throwing it together that is good enough to be wearable, but that I won't be getting heavy use out of.

I found this jacket (a full suit and pants actually) at a church rummage sale in town. It fit me relatively well in the chest could use a bit of slimming through the middle, but it was close enough. The sleeves were about 1"-1 1/4" too short, but it was in the last two hours of the sale and they were having a bag sale on all remaining clothing. Everything that fit in a bag for $2, who could pass that up?!

I brought it home and went to work. It should be noted that most jacket sleeves have a hem allowance right around 1 1/2" to 2", so if you find a jacket that needs a full 2" extra, or near that, you probably won't have any extra fabric to fold over for a hem, and even if you do, it will be easily visible because the hem is so short.

First thing to do is get out your seam ripper and separate the lining from the end of the hem inside the sleeve. Then rip any seams/ stitches holding the hem down and the seam at the ends of the overlap where the buttons meet. 


Seams ripped and ready for pressing. See where the old seam is in relation to the button? The one you can just see is the last of four.


With my jacket, in order to rip out the seams under the button overlap that held down the hem, I had to cut off the end of four buttons as it had been sewn through all layers of fabric and the lining (not sure if this was sloppy tailoring as it seems professionally made, or if the buttons were switched out/reattached at some point). Press out all old creased leaving yourself with something that looks like this.


The missing button was on the right of these three


The reason you want to open down the side seam where the buttons overlap a bit is that certain styles of jackets have a small amount of flare at the end of the sleeve and you want to be able to follow the line of the curve as necessary when you  lengthen it to get a nice straight seam.

Next step is to pin your fabric , I did this near the seam, but not right on top of it, you will be hand sewing the extra seam length underneath  where the side seams of the two arm pieces meet, not through from the top to the bottom, the part you see is actually a folded hem that gives a much cleaner look that visible stitches would


I drew over my pins in red so that they would show against the gray weave of the fabric, the circles are the ends of the pins, but you aren't sewing with your machine so the direction of the pins doesn't matter.


Here's the view from the inside, you can see a bit of bunching that I hadn't yet fixed before actually sewing.


That top seam in the above picture is the one you'll be sewing a long, then you can press the fold (the one next to your pins) after you're done adjusting the length. I simply sewed my seam with a quick backstitch. This doesn't have to be extremely strong as it most likely won't receive a lot of strain or wear and tear unless the jacket is worn daily and taken off/on multiple times a day.

To find your correct length, you have to put the jacket on and fit it to your wrist. The proper sleeve length of a jacket is supposed to hang where your thumb meets your wrist, but I find this is just a bit too high, esp with my long arms, it feels like any arm movement above my waist is pulling the sleeve up to my elbow. I added about a half an inch to that Then mark where your hem will go with your marking product of choice. I had a gray crayola washable marker that was barely visible and the mark will be directly on the hem's curve so I'm not worried about anyone seeing it/having to wash it out.


You can see the mark about half an inch up from the seam and about 3/4 of an inch in from the end of the fabric, it is going up and down in the picture.


I've found the best place to start your hem is right on the seam where the front and back sleeve pieces meet. This ensures that the seam lines up and that you aren't going to end up with a slanted or angled hem on your finished alteration.

I folded so that my mark was directly on the fold of my new hem (if your marking tool leaves a darker/more noticeable line try marking about 1/8 of an inch lower than you want your hem and fold your mark just under the hem onto the inside in case it doesn't wash/rug off completely).


Here is the outside seam matching up with the inside seam. Also this closeup shot gives a great view of all of the colors that are incorporated into this particular weave, blue, brown, and white makes for an overall gray look!


I then add a single stitch to hold the hem in place and provide stability, this isn't necessary if you are familiar with your fabric and comfortable with your pressing skills. I like to do it here especially because you can just quickly stitch the ditch in the seam that you just lined up and it is completely invisible.


here is my gray thread coming up out of the seam for my stabilizing stitch.


Now simply fold over the rest of your hem until you have a straight line across. Note: Your fabric's grain will most likely NOT fall along this line, don't let that be your guide! I like to take the hem that I just stitched between one set of thumb and forefinger, and the exact opposite side in the other hand, then roll the unstitched (button seam side ) between my fingers until it lays flat on both the top and the bottom when pulled just slightly taut (not stretched). I wish I had a picture of this, but two hands are needed and I don't have a tripod yet, sorry.

To be sure, always pin your seam, I like to do one pin on each side of the button overlap, then put the jacket on, see how it hangs, try moving your arms a bit in it (mimic the motions of cutting food and eating it, or a dancing pose, whatever you will be doing in the jacket) to make sure it is the length you want and that the hem isn't angled/crooked.

Funny story, I play upright string bass and my High School orchestra's concert dress for the guys was a tuxedo. My mom took me to Penny's (now JCP) to get a rtw tux my freshman year (shudder). It looked great in the store so we bought it. When I got on stage for the concert, my arm went up to play the notes ans the jacket sleeve was halfway to my elbow! For those of you who haven't seen someone play the string bass, here's how the instrument looks while I'm standing next to it at its proper height for playing.


This was me about five years ago and plus about fifty pounds!

Notice how the black part under the strings goes all the way up to the height of my forehead? Also notice how my sleeve, even with my hand only at shoulder height, is already back down my wrist about 3-4 inches? This was from my freshman year of college and it was a newer tux than my first one, but still just an off the rack Penny's buy (I was young and didn't know any better, plus they go on sale for the whole tux for $99). If I get myself involved in playing bass again here in Grand Forks (I hope to soon) I may have to look into what some of the professionals do. Do they tailor their jackets longer in the sleeve, or do they actually have that left sleeve longer than the right and only use it for performances?


Anyways, back to the sleeves on hand...I mean on wrist. Here's my finished (nearly) sleeves on me. Ignore how the jacket's bottom hem should technically be 1 1/2" to 2" lower, it's much less noticeable with the matching suit pants and perhaps a project for another day.


From the front (excuse my junky, thrown together workspace in the back)


Finally to reattach that button. Since I was adding length, I didn't want my buttons to begin a full four inches away from the hem. I had already removed the lowest button while ripping the seams, I sewed it back on, then took the highest of the four buttons and transplanted it (I'm using that term to make it sound more fancy and important) to the bottom of the row.


The right side with buttons reattached and moved around.

 
The left side before I had reattached the bottom button or move the top button to the bottom of the row, see what I mean about the buttons starting four inches up?


That's it folks. I didn't have enough lining to reach to my new hem, but the lining inside the sleeve was all ripped and torn in places anyways so I may replace that eventually also just to get some experience working with lining.


"Make do and mend." - Anon.

Matthew


Update: I forgot to add this picture of my hot date, Mrs. Suzie Q. Hanson, and I at the Mason's dinner last night, that's what I was altering this jacket for.


Aren't we just the cutest!

Glitches and Pillows and Parties OH MY!

Ugh...

Don't you just love when your computer decides to go on the fritz when you're right in the middle of a blog post? Yeah, me neither. After about 24 hours of my screen going fuzzy every time I try to turn it on/reboot it, I'm back in the game.

A bit frustrating, but lesson learned, now I'll be sure to try and get my posts written a bit ahead of time. I can hopefully also have a few spare posts tucked away for emergencies so that I can just hop online and post them in a pinch without having to type up everything on my phone or fiddle with pictures and links on an unfamiliar format.

Finally, it's time to reveal the long-awaited pillow! My sweetie loved his Valentine's day present and I was thrilled with mine in return, which means I get to show you all the pillow I've been hinting at for about a week!


Ta Da!!!
...and the back


Now, for the process, and let me tell you, it was pretty significant considering what it could/should have been. First we make a pattern for our shape.


I actually made this out of newspaper originally, but transferred it to white craft paper to be able to work with something a bit more stable.


Next I cut out two pieces of plain white cotton from a pillowcase that I had. I decided to do an inner pillow and a decorative pillow case for various reasons, so this is just for the pillow itself.

Make sure that you stuff your pillow really well, as it will be very likely to become more deflated than you want after a while if you only put enough stuffing to get it "firm enough" when it's brand new.

This picture shows the cluster stuffing and about the amount I used (2/3-3/4 of a 16 oz. bag)


Here's my pillow fully stuffed with the hole still open.


The last thing to do is finish off the seam with the stitch of your choice. I used a simple, quick and dirty blanket stitch for mine because it's going to be on the inside, and I didn't want to fiddle with the tension of the stuffing while trying to work my first invisible seam hand stitching.


Nothing fancy, but it gets the job done.

After that I used a tip that I found on a pillow case tutorial that suggests you make the pillow case just a bit smaller (an inch or less depending on the size of the pillow) to help keep it looking "fluffy" and firm. After my experiences here, I'd say that, if you've made your own inner pillow and stuffed it really well like I did, then don't do this. If, however, you're using a store bought pillow, this would be very helpful. Doing both is part of what caused some of my troubles later on.


I trimmed off a quarter of an inch all the way around because my pillow wasn't huge, I didn't think I needed a whole inch.


I decided to use more of the plain white cotton to make that back pieces, but didn't want just plain white, so I grabbed a permanent marker and started doodling. After a failed attempt at chevrons and diamonds, this is what I came up with.


Simple, easy, and personal.


My back is going to be envelope style, with two overlapping panels like on the back of a decorative sham in a bed comforter set.In the picture earlier of the completed back, you can see how this design was a bit flawed because my crosswords got lost and/or jumbled by the split.

For my front, I had a pile of blue and tan sweaters that I had bought with the intent of turning into a felted sweater quilt. Unfortunately no one told me that in order to felt a fabric, it has to be an animal fiber (wool, alpaca, etc.) or at least mostly one of these. All of the thrift store sweaters I had bought were mostly or completely cotton. Live and learn, then find a different project to use your color pallet on!


My stack of materials, they're folded so you can't see that I had already cut off all seams, cuffs, and collars for the felting process.


I had intended to do a more intentional design of these, but everything I sketched up wasn't doing it for me, and I didn't want to go to the extent of using a full out quilt design (stretchy fabric plus my first quilting attempt didn't sound like the greatest idea). Instead I grabbed two piece, sewed them together, added another piece of a different sweater at an odd angle and attached that, trimming the excess as I went. I guess it was sort of "freestyle quilting"and this was the result of my experiment.


Not bad, I liked it well enough, but maybe next time simple stripes would work.


I pinned down my pattern (minus the 1/4 inch I trimmed off) and cut my front piece. Then I cut out another piece of my white cotton at the same size to attach to the back in an attempt to discourage pulling and stretching when I put the front and back together.


A plus sign of baste stitches helped segment the shape in case any gathering or pulling occurred, only rip out a quarter of the seams!


I ended up with a few puckers and loose spots, so I simply added a few pleats to take up the extra fabric.


The arrow points to my pins, to the left of the yellow line is the pleat.


To finish it all off, I squeezed the pillow into the pillow case and found the back kept wanting to spread open a bit (remember the either or thing about firm stuffing and the smaller pillow case than pillow?) By now I was ready to be done, and it was coming down to the wire (Wednesday, the day of the exchange to be exact), so I took the easy way out by pinning it in place and adding three very small single stitches along the top back piece's edge to hold it in place.


This is my needle underneath one of the stitches so that it would show up in the picture, white on white and all.


To add a little icing to the cake, I drew myself the words "You Are Here" on one of the sections in fine point marker and stitched over it, because it's our first Valentine's Day together, so there isn't any such thing as too mushy ;-D


CUTE!


That's it! My first full on, beginning to end, sewing project. Somewhere a Home Ec. teacher is cringing and shaking their heads, but it was a fun learning experience and helped me a lot when it comes to breaking in my new machine!

Since I haven't posted for a few days, here a few other treats. I geeky bouquet of a dozen "Rose"s with a candy filled vase (on sale at Michael's in Jan for $3!!!) for my sweetie. I surprised him by having it delivered to him at work on Thursday (our gift exchange was the night before since that's when we both had off of work).


"Rose Tyler" is a character on the TV show "Dr. Who", Dave and I are both huge fans, so this saved a bit of money while also being really personal, unique, and a almost an inside joke.


Lastly, a picture of me and my date on the Thursday night, Suzie Q., a friend from the health club here in Grand Forks. We're the color coordinated ones, the other couple are Dusty and Caleb Miller, the club owners. We all went to a Valentine's dinner and show at the Masonic Lodge in town, what a blast!


Fun fact, this jacket is part of tomorrow's post!


Well everyone, I know it was a lot at once, but that's the last of it. I hope everyone had a fun, happy, and safe Valentine's. Now onto my jacket full time!!!

"Love is life. And if you miss love, you miss life." - Leo Buscaglia

Matthew

Monday, February 11, 2013

Just a Bit at a Time

Happy Monday All!

I hope none of you are having a Garfield-esque beginning to your week, but if you are, perhaps I can help to turn it around!

I don't have any new pictures to show you of my progress from yesterday because all that I worked on was my Valentine's present. However, I do have some pictures to share of my planned sewing space for when I get my own place. My current living situation is in one room of a house (about 98 sq. ft. with my desk and bookshelves being in public spaces, which makes it just barely doable). I love the house I'm in and my room mates, but unfortunately I came late to the game and moved in after everyone else had gotten settled and we'll all be going our separate ways in May, so trying to create a more permanent workspace at this point is a bit pointless.

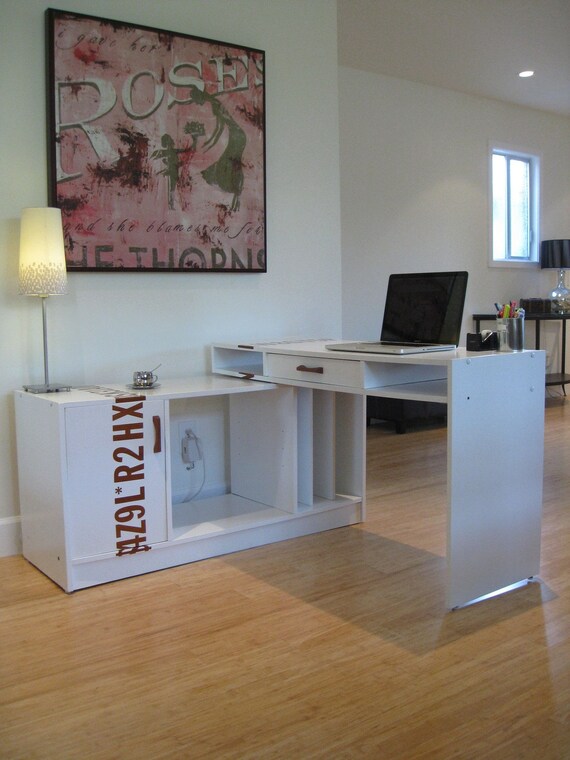
This doesn't mean that a sewer can't dream. I have a general idea of what I want for my sewing table once I get myself settled in a few months. This idea is a bit of a rough draft and can be adjusted in size depending on whether I end up in an apartment by myself or in another shared living situation (I'm trying to keep my options open at the moment). My inspiration is a table that I found on Etsy almost a year ago. I believe it was within my first month of discovering Etsy in fact!
Here's the link to the Etsy page of the creator LizKDesign, this particular item has already been sold, but I think I could easily create something similar for myself.

My thought is that I can have my sewing machine on the top piece, and perhaps a permanent pressing/ironing surface on the top of the base (the left half). I can always switch that around however and just use a tabletop ironing board (which I would probably make myself and shape to fit the space). I can also create a space below to store my sewing machine when it's not in use to save on space, which may very well be in short supply.

With this Idea, I will have the wall space above the desk for some sort of peg board or other storage system for thread, tools, bobins, pin cushions, etc. In fact, for that I am thinking of doing something else multifunctional such as a vanity style mirror that swings open to reveal storage and supplies (again allowing for a more clean, usable space when I'm not actively sewing/crafting).

At this point I'm trying to plan for a "worst case scenario" in which I end up in a studio/efficiency apartment where everything has to have multiple uses in order to keep my living space from descending into chaos.

I will definitely be using some of the little tips and tricks from Karen over at Sew Many Ways for her various sewing tables and work spaces over the years
including: magnets, yard sticks/measuring tape in plain sight, cable and electronics storage and functionality. Until I get my own piece put together and posted here (don't worry, it'll be well documented) I encourage you all to hop over to her blog and check out some of her great storage ideas and solutions.

I hope you, like me, can use a new and fun idea and fun inspiration as a way to help brighten your Monday, whether it needed brightening or not.

Stay crafty my friends.

Matthew

Sunday, February 10, 2013

That's a Wrap

Happy Sunday internet!

I hope you all have plans to enjoy the rest of your weekends, I know I do. I've recently started following the blog Sew Many Ways and Karen's post for today is for a Valentines Day "Linky Party". The idea is for people to post links to their own projects that are Valentines Day related.

At first I was extremely excited,  but then I realized that I would have to wait a whole five days until I could post my main gift (in case of spoilers). That's when I realized that I had intended a small side project to go with my gift that I could whip up and post immediately!

Here it is, a lovely Pinterest inspired stamp. Here's the original pin photo.


As you can see, it's quite self explanatory, so I'll spare you any sort of detailed description, just a few photos of my own project.

First, of course, our supplies: -Paper                        Check
                                                -Toilet paper roll       Check
                                                -Paint                         Check
                                                -NCIS marathon        Check  (don't forget the essentials)

Then my work space prepped (my paper likes to roll on me because it's heavy brown craft paper, so I had to tape it to a piece of foam board.

Then there's me stamping, waiting for it to dry, and stamping some more.

This is going to be the wrapping paper for my Valentine's gift. I added a little personal touch to a few of the hearts a la kissing tree carvings.

Hopefully he'll notice and realize that it's homemade. If not, it was a fun project that may inspire some of you to take some of the cost out of Valentine's Day by adding some time, thought and a little bit of love. After all, we sometimes need to remember what these commercialized holidays are really about.

"Money and power only last the hour, but friendship and love withstand the sky above."


Matthew


Something "Winter" This Way Comes

Hello all!

Today I am bracing myself for a long day stuck indoors until I work Monday evening. We have a blizzard warning in effect starting at 6 this morning until Monday morning with snow totals of 4-7 inches and winds from 25-45 mph! Not the storm of the century, but still a good reason to cuddle up with my Singer!

I'm happy to report that I had another wonderfully productive day yesterday. So much so that I neglected to post to tell you all about it!

On that subject, unfortunately I can't tell you too much as the subject of most of my work is a Valentine's Day gift, and I wouldn't want to risk spoiling it for the recipient. I can however tell you what I got done, and I will definitely be posting the many pictures that I took after this Thursday!

The project is a pillow and I decided to make an inner pillow with the stuffing in it and a removable pillow cover so that it would be easier to clean, and in case I ever need to add more fluff, I don't have to worry about doing the world's most "pretty" job of ripping it apart and resewing it if the need should arise.

I got the entire inner pillow finished, and I decorated and sewed the back pieces (two overlapping pieces of fabric rather than a zipper). I have spent some of my free time designing how I want the front to look. I will be using some cut up sweaters in a quilting/patchwork style, again, pictures at a later date.

In lieu of anything fun and shiny to show you, I have decided to take some time and jot down a few of my overall goals for this coming year, specifically for my sewing journey.

Here's what I came up with, mostly just in list form with a few dates/deadlines attached to individual goals or projects:

-Finish a wearable linen/cotton jacket to wear at my cousin's beach wedding by June

-Fashion myself a well fitting pair of dress pants either from a pattern or by drafting my own

-Begin collecting patterns and sewing/tailoring books for reference and future projects

-Sew a slip cover for my love seat

-Finish a passable "Malcolm Reynolds" (Captain Mal from "Firefly") costume for Halloween

-Begin to find and collect fun and unique fabrics to help inspire me for future projects

-Build/design myself a sewing space in my new apartment/room when I move in May

-Continue to grow my list of sewing related blogs that I read and get my foot in the door of the online sewing community for support, advice, and inspiration galore!

-Craft at least one piece for someone else (just to see if it's for me or not)

-Have a blast learning a new, rewarding, lifelong skill!!!

Well, now that's out of the way, I think I'm going to go get a hot cup of tea and enjoy a nice book before drifting off to sleep. I'll talk to you all soon!


"Winter is on my head, but eternal spring is in my heart." -Victor Hugo

P.S. Happy Chinese New Year everyone, enjoy the year of the snake (it's MY year, hooray!)

Matthew

Friday, February 8, 2013

New Beginnings

Happy Friday everybody!

I am extremely happy to say that I got a lot done yesterday. I just about got everything patterned out. I just have the collar, collar stand, pockets, and the front right piece (most I just get one half and will mirror it for the end piece, but this one needs the breast pocket marked and the button holes).

Supplies all laid out and ready to go!
I also went to Joann fabrics and got everything I need EXCEPT for a french curve. I was extremely frustrated, but I realized that, at least for these first few attempts, I don't think having a line that is a bit wobbly is going to make the biggest difference in the world. After all, the pin lines that I ended up with weren't that straight, and I still need to calculate and add cuff and seam allowances plus the extra 2 inches that I'm going to be adding to the torso.
Right sleeve all pinned down and ready to prick the outline.

Here's the pencil outline with labels and notes to remind me to add seam and cuff allowances. I'll be going over everything in sharpie later and then using tracing paper to make the copy that I'll end up cutting so that I can adjust sizes and proportions later if needed.
Quick question, does anyone have a recommendation as far as where is best to add those two inches, I was thinking the best place would be the side panels, but then I have to allow for the arm hole adjustments, and the patch pockets are mostly just covering the front piece, but they cross over about an inch onto the side panels. I feel like it would be a pretty big hassle, but at the same time, if I added it to the back I would ruin the lay of the double vents, and the front would probably make it lay funny and look lopsided.

I simply drew a line over the top of this patch pocket to mark the path of the side panel seam, for the darts in the front piece, I just measured how far under the pocket they went and continued the line to that point.
Here's the pencil outline of the same piece.
Anyways, today I'm going to try and finish those last few pattern pieces, and get at least a few pieces of fabric cut out, pre shrink my interfacing. Then I'm going to take a break to work on a Valentines day pillow for my sweetie. It's one of about 5-6 parts to his gift that I have planned out and the only one that I haven't gotten a start on. I'd prefer to NOT be the guy rushing like a crazy person on Wed. to finish everything (been there done that).

My front left pattern piece complete with pockets placed, darts drawn, and buttons...umm something that starts with "B"
I hope you were all able to be productive yesterday, and if not, then take this afternoon to put together a short list of what you hope to get done this weekend. Remember to keep it realistic, but still try to push yourself a bit. Maybe start in on a new hobby you've been meaning to try, or pick out a project that has been pushed to the back burner and take another crack at it.


Variety is the spice of life.


 Matthew