Showing posts with label Craft Storage. Show all posts

Monday, February 25, 2013

Decision, decisions, decisions

   Ugh, sometimes working an overnight shift can make for some interesting moments.

   Example, when you can't sleep after work, but decide to take a nap before your Oscar party, and wake up an hour before said party. This makes you have to choose between, tidying up for company or decorating for the party.

   Of course I chose to tidy up. In fact, I missed all of the red carpet coverage because I was busy throwing together my garlic bread. So instead of the promised Oscars decorations, here's a look at my new and improved sewing space. I apologize for the lighting in the pictures, it's a basement with horrible lighting, but the fact that it was after sunset didn't help at all.


Here's the current set up, I'm doing mostly pressing right now, so my little ironing board is winning the "Who gets the desktop" race against my Singer.
Just a few of my regularly used tools out in the open. Notice my sewing machine plug next to my pincushion, this means that I can easily swap out my sewing machine or my ironing board as needed without having to mess up the cables or pedal that are hidden behind the desk.

Here's the swap, notice the workplace essentials of a wine glass and candle for ambiance.
My tabletop ironing board could easily be set across that top box and the edge of my desk (that was my intention), but one of two outlets in the entire 30 ft long room, is over to the right of my cutting board and ruler. It can just barely reach, but I'd rather not have to fight the end of the cord.


     I hope this makes up a little bit for my getting your hopes up, though honestly I had only planned on a simple paper cut-out garland with some patterned paper popcorn cones, and of course Oscar ballots.

   Has anyone out there ever had to deal with a temporary or transitional workspace for your sewing and/or crafting? How did it go? Were you able to keep your space relatively well confined, or did you end up hauling everything out and then packing it back up again at the beginning and end of each session?

May your bobbin always be full!

Matthew

Sunday, February 17, 2013

Handanger, what is it and how do I pronounce it?

Folks, a few times in my posts I've mentioned Hardanger Embroidery. I just wanted to take some time and explain this particular needlecraft a bit as it is very near and dear to my heart.


Hardanger (pronounced hard-unger, like "Hunger" without the "H") is a traditional form of Norwegian Embroidery using 22 count cotton weave cloth (this is the standard, but other weaves can be used) and Perl cotton thread, typically ranging from #5 to #12 weight depending on the fabric being used, and the stitches being made. Traditionally it is done with the thread and the cloth being the same color, usually white or cream.

I am originally from southern Minnesota where there is a large community with strong Norwegian heritage. My Grandma Johnson (doesn't get much more Norwegian American than that, does it?) wasn't taught by her mother or grandmother or anything nostalgic like that. Rather, she and some of her girlfriend decided to take a class offered through the town's Community Ed. services, and after the class finished, they continued to meet up once a week to work on their various projects, share tips and experiences, learn/new stitches, and chit chat. They were lucky enough to have the lovely lady who had lead the class join them and help with any tips or advanced techniques.

My Grandmother has been gone for 8 years this coming April, and to this day, some of my most vivid memories of her involve her sitting in her armchair and working away at a doily or table runner while Grandpa sat watching TV.

So when I decided to do a "homemade" Christmas this last year (honestly intended to save a bit of money on a tight budget), I chose to begin teaching myself Hardanger in honor of my Grandmother's memory.

The basic supplies needed are cloth, thread, and needles. Typically two weights of thread are used for any given project, if your heavier thread is #5, then you will usually use #8 (one level finer) for any needle-weaving. Whereas using #8 for your blocks would mean buying #12 for the detailed work. I typically use #5 and #8 as there are more colors readily available in these sizes than #12.


A close up of my current Hardanger supply box featured in yesterday's organizing post. Different colors and weights of thread, fine point scissors, and two different sizes of tapestry needles (20 and 22) along the right side.


The basis of all Hardanger pieces is a block of stitches referred to as a Kloster Block. It looks like this.

These are places corner to corner or end to end to create "step" and "row" type patterns to create an outline shape, then further blocks are places inside as well as decorative blocks, needle-weaving, and other patterns to create the details of the design.

Hardanger today is used mostly for doilys, table runners, and decorative pillows, but the possibilities are endless. Full tablecloths, window treatments, Christmas ornaments, card inserts, bookmarks, even full bed coverings.

Here are some samplings of the simple doily patterns that I currently own.

The top is a pictured design in a book I was given by one of Grandma's stitching buddies (Thanks Kathy!) The bottom is a spare card insert from Christmas, I wanted to have one almost all the way done in case it turned out I had forgotten somebody, or one got messed up during the card assembly process.


Personally, I find hand stitching to be extremely relaxing and I always keep a Hardanger piece in progress to keep my hands busy and give my mind (slightly ADD here) a task to focus on. I am addicted to classical Minnesota Public Radio, and often prefer this to watching TV, unless there is a specific movie or show on that I want to watch. I also listen to a lot of audio books and these are great to do while stitching away because you don't need your eyes.

What sort of projects do you do for "crafting therapy" either when you're in a slump, or just on the side? Have you ever looked into the creative and cloth based traditions of your own heritage? If not, hop online and see what you find, it's great way to connect with your roots, and can lead to some very meaningful pieces to give as gifts to family members.


Writing Sewing is a form of therapy; sometimes I wonder how all those who do not write sew, compose, or paint can manage to escape the madness, melancholia, the panic and fear which is inherent in a human situation.”
-Graham Green (altered slightly)

Matthew

Saturday, February 16, 2013

How to Procrastinate by being Productive

My plan for today was to get the torso pieces of my muslin sewn together. I know this is a quick process which makes it odd that I've managed to get sidetracked at this point of all points, but hear me out. If you look at my post from yesterday, you'll see my workspace in the background of the pictures towards the bottom. It consists of a couch that I sit on, a loveseat next to me with some extra supplies strewn across it, with a large ottoman in front of me that I work on top of/set my sewing machine on to work.

Due to the fact that I share the house I live in with three other people, I can't keep it all laid out like I might if it were just me, and even then I shouldn't. Therefore I decided to take some time to reorganize some of my crafting supplies into storage containers so that the process of setting it all up and taking it all down will go a bit more smoothly in the future. This will also be really helpful to already have a place for everything when I move the beginning of May.

First things first, I gathered together everything I could find for supplies, tools, materials, and appliances that I use for crafting and sewing of any sort. To give you some scope of how spread out it all was, I was simply throwing everything in a large plastic bag and it took me a full fifteen minutes to get all of the nooks and crannies checked to make sure I got everything.

Then I split it all up into categories: cloth materials, writing utensils, sewing accessories, embroidery misc, etc, etc, etc.

These I placed into various boxes and containers. It's not completely done, but I got about 4-5 boxes started and a bag full of items that could go multiple places and I haven't decided what to do with. Here are a few of my completed boxes, I still have a few desk drawers with a nice variety of office supplies all in one place that I use frequently both in and outside of craft projects. Sorry I didn't take any "during" pictures, but I had really intended to get some work done on my muslin (and the evening is still young, so who knows) but I had to make sure that I got something posted for you all to chew on.

It's not a perfect system, and it isn't meant to be permanent, but I'm in a pinch, and it'll certainly do.

Enjoy!!!


Sewing supplies, thread, cutting tools, pins, needles, etc.


My current fabric "stash" is literally contained withing this box...I will look back someday (hopefully soon) and laugh.


Mostly writing utensils, some rubber bands and ribbon to help fill in the extra space. Note: this container is a 12"x12" scrap booking box that was on sale at Michael's in Jan for around $3-$4, clear with a lid that snaps and they stack wonderfully.


The box below used to be my Hardanger supplies, it's an old tissue box with cut off plastic cup bottoms attached to separate off balls of #5 perl cotton embroidery thread. I'm going to be moving this all to the lovely Dr. Who  lunchbox that my boyfriend gave me for Valentine's Day to keep by my bedside and travel with easily.


Everything that I have packed up so far, there are also some items that don't fit in most boxes, my singer, cutting mat, tailor's curve, quilting ruler, and portable ironing board. I'm going to be putting everything into one big Sterilite tub for the move, and possibly for temporary storage in my new home until I can construct a sewing/crafting space.


Monday, February 11, 2013

Just a Bit at a Time

Happy Monday All!

I hope none of you are having a Garfield-esque beginning to your week, but if you are, perhaps I can help to turn it around!

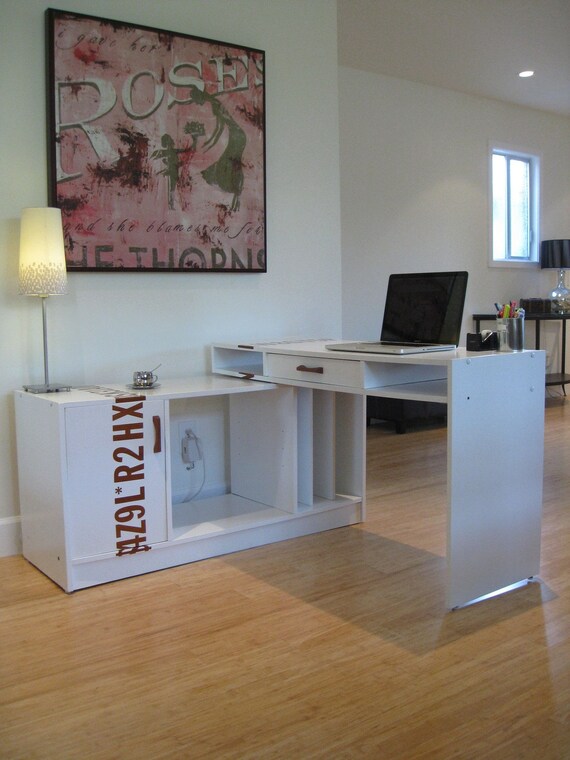
I don't have any new pictures to show you of my progress from yesterday because all that I worked on was my Valentine's present. However, I do have some pictures to share of my planned sewing space for when I get my own place. My current living situation is in one room of a house (about 98 sq. ft. with my desk and bookshelves being in public spaces, which makes it just barely doable). I love the house I'm in and my room mates, but unfortunately I came late to the game and moved in after everyone else had gotten settled and we'll all be going our separate ways in May, so trying to create a more permanent workspace at this point is a bit pointless.

This doesn't mean that a sewer can't dream. I have a general idea of what I want for my sewing table once I get myself settled in a few months. This idea is a bit of a rough draft and can be adjusted in size depending on whether I end up in an apartment by myself or in another shared living situation (I'm trying to keep my options open at the moment). My inspiration is a table that I found on Etsy almost a year ago. I believe it was within my first month of discovering Etsy in fact!
Here's the link to the Etsy page of the creator LizKDesign, this particular item has already been sold, but I think I could easily create something similar for myself.

My thought is that I can have my sewing machine on the top piece, and perhaps a permanent pressing/ironing surface on the top of the base (the left half). I can always switch that around however and just use a tabletop ironing board (which I would probably make myself and shape to fit the space). I can also create a space below to store my sewing machine when it's not in use to save on space, which may very well be in short supply.

With this Idea, I will have the wall space above the desk for some sort of peg board or other storage system for thread, tools, bobins, pin cushions, etc. In fact, for that I am thinking of doing something else multifunctional such as a vanity style mirror that swings open to reveal storage and supplies (again allowing for a more clean, usable space when I'm not actively sewing/crafting).

At this point I'm trying to plan for a "worst case scenario" in which I end up in a studio/efficiency apartment where everything has to have multiple uses in order to keep my living space from descending into chaos.

I will definitely be using some of the little tips and tricks from Karen over at Sew Many Ways for her various sewing tables and work spaces over the years
including: magnets, yard sticks/measuring tape in plain sight, cable and electronics storage and functionality. Until I get my own piece put together and posted here (don't worry, it'll be well documented) I encourage you all to hop over to her blog and check out some of her great storage ideas and solutions.

I hope you, like me, can use a new and fun idea and fun inspiration as a way to help brighten your Monday, whether it needed brightening or not.

Stay crafty my friends.

Matthew